
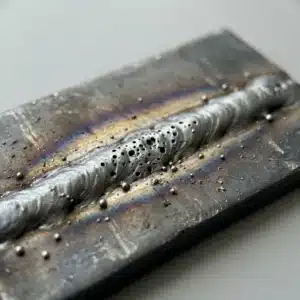
Most weld problems come down to a few causes: MIG porosity is usually dirty metal or lost shielding gas, a stick rod that keeps sticking usually needs more amps, and gasless flux core spatters when the polarity is wrong. Pick your process and what you see for the likely causes in order and the fix for each.
What’s wrong with your weld?
Pick your process and what you see. You get the likely causes, most likely first, how to tell them apart, and the fix for each.
Amps too low
The most likely cause. Check it first, then work down the list.
- What it looks likeThe rod freezes to the metal when you strike, or the arc keeps going out.
- Change one thing at a time, and run a short test bead after each change.
Rod sticks or won’t start: check in this order
Amps too low
- How to tell
- The arc is hard to start, the rod sticks again and again, and the arc sputters as if it’s about to go out.
- Fix
- Turn the amps up in small steps. Start in the middle of the range for your rod and size.
Stick Welding Amperage Chart by Rod SizeSource: Introduction to Welding 8.4; Randy’s rod sticking guide
Striking too hard
- How to tell
- It sticks the moment you strike, then runs fine once the arc is going.
- Fix
- Strike like a match: a quick, light scratch, then lift to arc length. Scratching is easier than tapping, and pressing harder only makes it stick.
Source: Introduction to Welding 8.4; Randy’s rod sticking guide
Arc too short
- How to tell
- It sticks partway along the weld, and the bead piles up cold before it does.
- Fix
- Hold a gap of about one rod diameter between the rod tip and the pool.
Source: Introduction to Welding 8.4
Rust, paint or a dirty ground
- How to tell
- It is hard to start on rusty or painted steel but fine on clean metal.
- Fix
- Grind to bright metal where you weld and where the ground clamp goes. Rust adds resistance, so less current reaches the arc.
Source: Randy’s rod sticking guide
Damp or damaged flux
- How to tell
- The coating is cracked, chipped or crumbling, or the rods sat out in damp air.
- Fix
- Use rods with a sound coating, and store and re-dry them as the oven chart says.
Welding Rod Oven Temperature ChartSource: Randy’s rod sticking guide; Randy’s guide to heating rods
The machine struggles to start an arc
- How to tell
- A machine with low open-circuit voltage loses the arc and sticks whatever you do.
- Fix
- Turn up hot start or arc force (dig) if the machine has it; it helps keep the rod from sticking on a short arc.
Source: Introduction to Welding 8.4; Randy’s rod sticking guide
Welding problems, causes and fixes
Every problem in the troubleshooter, by process. Open one to see its causes in order, how to tell them apart, and the fix.
Stick welding problems
Rod sticks or won’t start
The rod freezes to the metal when you strike, or the arc keeps going out.
Amps too low
- How to tell
- The arc is hard to start, the rod sticks again and again, and the arc sputters as if it’s about to go out.
- Fix
- Turn the amps up in small steps. Start in the middle of the range for your rod and size.
Stick Welding Amperage Chart by Rod SizeSource: Introduction to Welding 8.4; Randy’s rod sticking guide
Striking too hard
- How to tell
- It sticks the moment you strike, then runs fine once the arc is going.
- Fix
- Strike like a match: a quick, light scratch, then lift to arc length. Scratching is easier than tapping, and pressing harder only makes it stick.
Source: Introduction to Welding 8.4; Randy’s rod sticking guide
Arc too short
- How to tell
- It sticks partway along the weld, and the bead piles up cold before it does.
- Fix
- Hold a gap of about one rod diameter between the rod tip and the pool.
Source: Introduction to Welding 8.4
Rust, paint or a dirty ground
- How to tell
- It is hard to start on rusty or painted steel but fine on clean metal.
- Fix
- Grind to bright metal where you weld and where the ground clamp goes. Rust adds resistance, so less current reaches the arc.
Source: Randy’s rod sticking guide
Damp or damaged flux
- How to tell
- The coating is cracked, chipped or crumbling, or the rods sat out in damp air.
- Fix
- Use rods with a sound coating, and store and re-dry them as the oven chart says.
Welding Rod Oven Temperature ChartSource: Randy’s rod sticking guide; Randy’s guide to heating rods
The machine struggles to start an arc
- How to tell
- A machine with low open-circuit voltage loses the arc and sticks whatever you do.
- Fix
- Turn up hot start or arc force (dig) if the machine has it; it helps keep the rod from sticking on a short arc.
Source: Introduction to Welding 8.4; Randy’s rod sticking guide
Porosity (holes in the weld)
Round pinholes or bubbles on the surface or inside the weld: gas trapped as the metal froze.
Arc too long, or porosity at the start
- How to tell
- Pores cluster where each rod starts, or along a stretch held with a long, noisy arc; common with E7018.
- Fix
- Hold a tight arc, about one rod diameter. Strike a little ahead of the joint, then move back over the start and weld on (backstep), so the first metal is remelted.
Source: Introduction to Welding 8.4
Damp rods
- How to tell
- Pores keep showing on clean steel, most often with low-hydrogen rods like 7018 that were left out of the oven.
- Fix
- Use rods straight from the oven, or re-dry them. Standard 7018 should go back in the oven within about 4 hours.
Welding Rod Oven Temperature ChartSource: Randy’s guide to heating rods
Dirty metal
- How to tell
- Pores where rust, oil, paint or grease was left on the steel.
- Fix
- Grind or degrease to bright metal. Stick copes with dirt better than MIG, but not with heavy contamination.
Source: Lincoln Electric
Damp weather
- How to tell
- You are welding outside in rain, fog or mist.
- Fix
- Shelter the work and keep the rods dry. Preheating the part drives off moisture.
Source: Randy’s welding-in-the-rain guide
Too much spatter
Balls of metal stuck around the weld, on the plate and in the nozzle.
Amps too high
- How to tell
- A wide, flat bead, undercut at the edges, and a long teardrop-shaped pool instead of an oval.
- Fix
- Turn the amps down.
Stick Welding Amperage Chart by Rod SizeSource: Introduction to Welding 8.4
Arc too long
- How to tell
- The arc is loud and violent, and the pool runs hot and fluid.
- Fix
- Close the gap to about one rod diameter.
Source: Introduction to Welding 8.4
Arc blow
- How to tell
- The arc pulls to one side and throws spatter, worst near the ends of the joint.
- Fix
- Move the ground clamp or switch to AC (see “Arc wanders or blows to one side”).
Source: Introduction to Welding 8.4
Damp rods
- How to tell
- The rods were left out of the oven or in damp air.
- Fix
- Use dry rods: dry low-hydrogen rods give a steadier arc with less spatter.
Welding Rod Oven Temperature ChartSource: Randy’s guide to heating rods
Undercut (a groove along the edge)
A groove melted into the plate along the edge (toe) of the weld and left unfilled.
Amps too high
- How to tell
- A wide, flat bead with grooves at the edges and plenty of spatter.
- Fix
- Turn the amps down.
Stick Welding Amperage Chart by Rod SizeSource: Introduction to Welding 8.4
Arc too long
- How to tell
- Undercut comes with spatter and a violent arc.
- Fix
- Hold a gap of about one rod diameter.
Source: Introduction to Welding 8.4
Travel too fast
- How to tell
- A narrow bead with grooves along both edges.
- Fix
- Slow down so the pool fills the edges before you move on.
Source: Introduction to Welding 8.4
Cold lap or lack of fusion
Weld metal rolls over the edges or sits on the plate without melting into it.
Travel too slow
- How to tell
- The bead piles up and rolls over the edges.
- Fix
- Speed up.
Source: Introduction to Welding 8.4
Arc too short
- How to tell
- A cold-looking bead that sits on top, and the rod keeps trying to stick.
- Fix
- Lift to about one rod diameter.
Source: Introduction to Welding 8.4
Amps too low
- How to tell
- A narrow bead with a high crown and little penetration.
- Fix
- Turn the amps up.
Stick Welding Amperage Chart by Rod SizeSource: Introduction to Welding 8.4
Tall, narrow, ropey bead
A high, rounded bead that sits on the surface with little penetration.
Amps too low
- How to tell
- A narrow, high-crowned bead, and the rod sticks or sputters too.
- Fix
- Turn the amps up.
Stick Welding Amperage Chart by Rod SizeSource: Introduction to Welding 8.4
Travel too fast
- How to tell
- A narrow pool and a thin, stringy bead.
- Fix
- Slow down.
Source: Introduction to Welding 8.4
Burn-through on thin metal
The arc melts holes through the plate, or the weld sags out the back.
Amps too high
- How to tell
- The arc digs at the edges and melts through.
- Fix
- Turn the amps down.
Stick Welding Amperage Chart by Rod SizeSource: Introduction to Welding 8.4
Rod too big for the metal
- How to tell
- A thick rod on thin sheet needs more amps than the sheet can take.
- Fix
- Use a smaller rod: 3/32 in on 1/8–3/16 in plate (ESAB). ESAB doesn’t recommend stick on very thin sheet; if you must, use the smallest rod (1/16–5/64 in) at the bottom of its range.
Stick Welding Amperage by Metal ThicknessSource: ESAB
A digging rod on thin metal
- How to tell
- You are running E6010 or E6011, which dig deep.
- Fix
- E6013 has a soft, shallow arc made for sheet metal.
Welding Rod Chart and Number DecoderSource: Introduction to Welding 8.3
Slag trapped in the weld
Pockets or lines of slag left inside the weld or between passes.
Slag not cleaned between passes
- How to tell
- Slag lines between the passes of a multi-pass weld.
- Fix
- Chip and wire-brush every pass before you run the next.
Source: Hobart Brothers; Introduction to Welding 19.2
Slag running ahead of the arc
- How to tell
- Slag rolls in front of the pool and gets welded over.
- Fix
- Drag the rod (lean it back toward the finished weld) and keep the arc ahead of the slag.
Source: Hobart Brothers
Too cold
- How to tell
- The slag freezes before it can float out of the pool.
- Fix
- Turn the amps up a little.
Stick Welding Amperage Chart by Rod SizeSource: Hobart Brothers
No room for the next pass
- How to tell
- Inclusions at the sides of a deep or narrow groove.
- Fix
- Place each bead so the next one has room, and open the groove if needed.
Source: Hobart Brothers
Cracks in or at the end of the weld
Cracks along the bead, at its edges, or in the dip where the weld stopped.
Hydrogen from damp rods
- How to tell
- Cracks at the edges or under the bead, mostly with low-hydrogen rods that picked up moisture.
- Fix
- Keep low-hydrogen rods dry in an oven, and re-dry any that sat out.
Welding Rod Oven Temperature ChartSource: Randy’s guide to heating rods
Crater left unfilled
- How to tell
- A small crack in the dip where the weld stopped.
- Fix
- Pause to fill the crater before you break the arc.
Source: Introduction to Welding 19.2
The weld cools too fast
- How to tell
- Cold, damp conditions or thick plate.
- Fix
- Preheat the part before welding.
Source: Randy’s welding-in-the-rain guide
Arc wanders or blows to one side
The arc bends away from where you point the rod, often near the ends of a joint.
Magnetic arc blow on DC
- How to tell
- The arc bends away from where you point it, near the ends of a joint or a corner.
- Fix
- Move the ground clamp, use more than one clamp, or switch to AC.
Welding Polarity Chart: DCEP, DCEN or ACSource: Introduction to Welding 8.4
Long arc or high amps
- How to tell
- A long, wandering arc at high current.
- Fix
- Use the lowest amps that still weld well, hold a tight arc, and adjust arc force (dig).
Source: Introduction to Welding 8.4
MIG welding problems
Porosity (holes in the weld)
Round pinholes or bubbles on the surface or inside the weld: gas trapped as the metal froze.
Dirty metal
- How to tell
- Pores where rust, oil, paint or grease was left.
- Fix
- Grind or degrease first. Never use a chlorinated degreaser near the arc: its fumes can turn into toxic gas.
Source: Lincoln Electric
Not enough gas reaching the weld
- How to tell
- Pores all along the weld.
- Fix
- Set about 30–40 CFH on a flowmeter (a pressure regulator alone doesn’t set flow) and check hoses, fittings and the gun for leaks.
Source: Lincoln Electric; Miller Electric
Drafts or wind
- How to tell
- Pores outdoors, or near a fan or an open door.
- Fix
- Put up a screen. The AWS D1.1 structural code does not allow gas-shielded welding in wind over 5 mph (8 km/h) unless the weld is sheltered.
Source: AWS D1.1; Lincoln Electric
Clogged nozzle or too much flow
- How to tell
- Spatter built up in the nozzle or diffuser, or the flow turned right up.
- Fix
- Clean the nozzle and diffuser, and keep the flow in range: turbulent gas pulls air in.
Source: Lincoln Electric; Introduction to Welding 9.2
Too much stickout or gun angle
- How to tell
- More than 1/2 in of wire past the nozzle, or the gun tipped steeply.
- Fix
- Keep stickout to 1/2 in or less and the gun angle small.
Source: Miller Electric
Pulling the gun
- How to tell
- You drag (pull) the gun instead of pushing it.
- Fix
- Push at 5–10° so the gas lies ahead of the arc and settles into the joint.
Source: Lincoln Electric
Wet or bad gas cylinder
- How to tell
- Everything else checks out.
- Fix
- Swap the cylinder and tell your gas supplier.
Source: Miller Electric
Too much spatter
Balls of metal stuck around the weld, on the plate and in the nozzle.
Voltage too low
- How to tell
- A loud, raspy arc, and the wire stubs into the plate.
- Fix
- Raise the voltage a step at a time until the arc settles into a steady buzz.
Source: Lincoln Electric
Voltage or travel speed too high
- How to tell
- A steady hiss, a wide bead and undercut.
- Fix
- Lower the voltage or slow down.
Source: Miller Electric; Lincoln Electric
Too much stickout
- How to tell
- More than 1/2 in of wire showing past the nozzle.
- Fix
- Shorten it.
Source: Miller Electric
Straight CO2 or poor gas coverage
- How to tell
- You run 100% CO2, or the flow is low.
- Fix
- Check the flow. A 75% argon, 25% CO2 mix (C25) spatters less than straight CO2.
Source: Introduction to Welding 10.4; Miller Electric
Dirty metal or rusty wire
- How to tell
- Rust, mill scale or oil on the plate, or rust on the wire.
- Fix
- Clean the metal and replace rusty wire.
Source: Miller Electric
Worn or wrong contact tip
- How to tell
- The tip hole is worn oval, or too big for the wire.
- Fix
- Fit a new tip of the right size for your wire.
Source: Miller Electric; Lincoln Electric
Undercut (a groove along the edge)
A groove melted into the plate along the edge (toe) of the weld and left unfilled.
Voltage too high
- How to tell
- A steady hissing arc and grooves at the edges.
- Fix
- Turn the voltage down.
Source: Lincoln Electric
Travel too fast
- How to tell
- A narrow bead with unfilled edges.
- Fix
- Slow down so the weld fills the edges.
Source: Introduction to Welding 9.4; Hobart Brothers
Gun angle
- How to tell
- Undercut on one side only, such as the top edge of a horizontal fillet.
- Fix
- Aim the gun a little more toward that side, and pause at the edges if you weave.
Source: Hobart Brothers
Cold lap or lack of fusion
Weld metal rolls over the edges or sits on the plate without melting into it.
Gun angle or arc position
- How to tell
- The weld sits on the plate with an edge that never melted in.
- Fix
- Hold a 0–15° gun angle and keep the arc on the leading edge of the pool.
Source: Miller Electric
Not enough heat
- How to tell
- The bead looks fine but sits on top, often on thick plate with a small machine.
- Fix
- Raise the voltage or wire speed. Short-circuit welds can look good and still not fuse, so check with a bend test.
Source: Miller Electric; Lincoln Electric
Travel too slow
- How to tell
- The pool rolls ahead of the arc and laps over the edges.
- Fix
- Speed up.
Source: Miller Electric
Short-circuit MIG on thick plate
- How to tell
- Thick steel welded in short-circuit transfer.
- Fix
- Use flux core, or spray transfer, for heavy plate.
Source: Lincoln Electric; Introduction to Welding 10.4
Tall, narrow, ropey bead
A high, rounded bead that sits on the surface with little penetration.
Settings too cold
- How to tell
- A high, rope-like bead with poor fusion at the edges.
- Fix
- Check that the wire speed (amps) suits the thickness, then raise the voltage.
Source: Lincoln Electric; Miller Electric
Pulling the gun
- How to tell
- You weld with a pull (drag) angle.
- Fix
- Push at 5–10° for a flatter bead.
Source: Lincoln Electric
Work cable too small or worn
- How to tell
- The work cable or ground clamp gets hot.
- Fix
- Fit a cable sized for your amps and its length, and clamp to clean metal.
Source: Lincoln Electric
Burn-through on thin metal
The arc melts holes through the plate, or the weld sags out the back.
Too much heat
- How to tell
- Holes in metal thinner than about 1/8 in.
- Fix
- Lower the voltage or the wire speed.
Source: Miller Electric
Travel too slow
- How to tell
- Heat builds up in one spot.
- Fix
- Move faster. This matters most on thin aluminum.
Source: Miller Electric
Wire birdnests, slips or burns back
Wire tangles at the drive rolls, feeds unevenly, or welds itself to the contact tip.
Drive roll tension
- How to tell
- The wire slips at the rolls (too loose), or comes out flattened and tangles (too tight).
- Fix
- With the welding output off, feed the wire and pinch it where it leaves the gun. If your fingers can stop it, add tension; stop adding once they can’t.
Source: Lincoln Electric
Worn or wrong drive rolls
- How to tell
- Worn grooves, or a groove that doesn’t match the wire.
- Fix
- Match the roll to the wire size: V groove for steel, U groove for aluminum.
Source: Introduction to Welding 10.2; Lincoln Electric
Dirty, kinked or wrong-size liner
- How to tell
- The wire drags when you pull it by hand, or the gun cable is coiled tight.
- Fix
- Blow the liner out from the tip end with low-pressure air or replace it, and keep the cable straight.
Source: Lincoln Electric; Introduction to Welding 9.2
Worn or wrong contact tip
- How to tell
- Burnback (the wire welds itself to the tip) or an unsteady arc.
- Fix
- Replace the tip with one sized for your wire.
Source: Lincoln Electric
Spool coasting
- How to tell
- Loose loops on the spool after you let go of the trigger.
- Fix
- Tighten the spool brake until the spool stops when the wire stops.
Source: Lincoln Electric
Aluminum wire in a standard gun
- How to tell
- Soft aluminum wire jams in a long gun cable.
- Fix
- Use a plastic liner and a spool gun or push-pull gun.
Source: Introduction to Welding 10.2
Flux core welding problems
Porosity (holes in the weld)
Round pinholes or bubbles on the surface or inside the weld: gas trapped as the metal froze.
Too much stickout
- How to tell
- The contact tip held farther from the work than the wire maker lists, or the distance keeps changing.
- Fix
- Hold the maker’s distance and keep it steady: about 1/2–5/8 in from contact tip to work for small gasless wires like Lincoln NR-211-MP.
MIG Welding Settings ChartSource: Hobart Brothers; Lincoln NR-211-MP data sheet; Introduction to Welding 9.4
Voltage too high
- How to tell
- Pores together with worm tracks on the bead.
- Fix
- Lower the voltage half a volt at a time.
Source: Hobart Brothers
Dirty metal
- How to tell
- Rust, oil, paint, coatings or moisture left on the plate.
- Fix
- Clean the plate before welding.
Source: Hobart Brothers
Impurities in the steel
- How to tell
- Steel high in sulfur or phosphorus.
- Fix
- Use a different grade of steel where the job allows.
Source: Hobart Brothers
Worm tracks on the bead
Small worm-shaped marks on the surface of a flux core bead.
Voltage too high for the wire speed
- How to tell
- Worm-shaped marks on the bead, sometimes with pores.
- Fix
- Start from the wire maker’s settings, then lower the voltage half a volt at a time until the marks stop.
Source: Hobart Brothers
Slag trapped in the weld
Pockets or lines of slag left inside the weld or between passes.
Pushing instead of dragging
- How to tell
- You push the gun, and slag runs ahead of the pool.
- Fix
- Drag the gun: 15–45° in the flat, horizontal and overhead positions, 5–15° vertical up.
Source: Hobart Brothers
Too cold
- How to tell
- Slag lines on low settings.
- Fix
- Raise the voltage until the inclusions stop.
Source: Hobart Brothers
Poor cleaning between passes
- How to tell
- Slag lines between the passes.
- Fix
- Clean every pass fully before the next.
Source: Hobart Brothers
Bead placement
- How to tell
- Inclusions in the corners of deep grooves.
- Fix
- Leave room for the next pass, and widen the groove if needed.
Source: Hobart Brothers
Too much spatter
Balls of metal stuck around the weld, on the plate and in the nozzle.
Wrong polarity
- How to tell
- Heavy spatter and a harsh arc. Most gasless wire (E71T-11, E71T-8) runs electrode negative; check the spool.
- Fix
- Set the polarity the spool gives: for E71T-11 the gun lead goes on negative (DCEN) and the ground on positive. Drag the gun.
Welding Polarity Chart: DCEP, DCEN or ACSource: Miller Electric
Voltage too low
- How to tell
- Spatter with a rough, stubbing arc.
- Fix
- Raise the voltage.
Source: Miller Electric
Long stickout or worn tip
- How to tell
- Lots of wire showing, or a tip worn oval.
- Fix
- Shorten the stickout and replace the tip.
Source: Miller Electric
Undercut (a groove along the edge)
A groove melted into the plate along the edge (toe) of the weld and left unfilled.
Current or voltage too high
- How to tell
- Grooves at the edges of a wide, hot bead.
- Fix
- Turn the wire speed and voltage down.
Source: Hobart Brothers
Travel too fast
- How to tell
- A narrow bead with unfilled edges.
- Fix
- Slow down so the weld fills the edges.
Source: Introduction to Welding 9.4; Hobart Brothers
Gun angle or weave
- How to tell
- Undercut on one side only.
- Fix
- Adjust the angle, and pause at each side when you weave.
Source: Hobart Brothers
Cold lap or lack of fusion
Weld metal rolls over the edges or sits on the plate without melting into it.
Travel too slow
- How to tell
- A tall, convex bead that laps over the edges.
- Fix
- Speed up so the pool doesn’t get ahead of the wire.
Source: Introduction to Welding 9.4; Hobart Brothers
Travel too fast
- How to tell
- A small bead that didn’t fuse at the edges.
- Fix
- Slow down.
Source: Introduction to Welding 9.4
Too cold
- How to tell
- Shallow fusion on thick plate.
- Fix
- Raise the voltage and wire speed.
Source: Hobart Brothers
Angle or joint access
- How to tell
- Unfused sidewalls in a groove weld.
- Fix
- Aim into the joint with a 15–45° drag, and hold the arc briefly on each sidewall when you weave.
Source: Hobart Brothers
Dirty metal
- How to tell
- Rust, scale or paint in the joint.
- Fix
- Clean the joint before welding.
Source: Hobart Brothers
Burn-through on thin metal
The arc melts holes through the plate, or the weld sags out the back.
Too much heat
- How to tell
- The weld melts through and hangs under the joint.
- Fix
- Pick a lower voltage, lower the wire speed, and travel faster.
Source: Hobart Brothers
Wire birdnests, slips or burns back
Wire tangles at the drive rolls, feeds unevenly, or welds itself to the contact tip.
Wrong drive rolls
- How to tell
- Crushed or flattened wire.
- Fix
- Flux core wire is soft and hollow: use knurled V-groove rolls.
Source: Hobart Brothers; Introduction to Welding 9.2
Drive roll tension too high
- How to tell
- Flattened wire that birdnests at the rolls.
- Fix
- Release the tension, then tighten it while feeding the wire into your gloved palm, stopping half a turn past where it slips.
Source: Hobart Brothers
Blocked or wrong liner
- How to tell
- The wire drags in the gun cable.
- Fix
- Replace a blocked liner, trim it to the maker’s length, and use the size for your wire.
Source: Hobart Brothers
Burnback
- How to tell
- The wire welds itself to the contact tip.
- Fix
- Raise the wire speed, don’t hold the tip closer than the maker’s distance (about 1/2–5/8 in for small gasless wires), and replace the tip.
Source: Hobart Brothers; Lincoln NR-211-MP data sheet
TIG welding problems
Porosity (holes in the weld)
Round pinholes or bubbles on the surface or inside the weld: gas trapped as the metal froze.
Wrong gas
- How to tell
- The cylinder holds a MIG mix (argon with CO2).
- Fix
- Use 100% argon, or an argon-helium mix for thick aluminum.
Source: Miller Electric
Gas flow too low or too high
- How to tell
- Pores or a sooty weld, with the flow far from 15–20 CFH.
- Fix
- Set 15–20 CFH. More is not better: too much flow makes turbulence that pulls air in.
Source: Miller Electric; Introduction to Welding 11.2
A leak
- How to tell
- The flow is right, but the weld is still contaminated.
- Fix
- Brush soapy water on every fitting and hose. Bubbles mean a leak; replace that part.
Source: Miller Electric
Drafts
- How to tell
- A fan, open door or wind nearby.
- Fix
- Block the draft.
Source: Introduction to Welding 20.2
Dirty base or filler metal
- How to tell
- Mill scale, oil, oxide or dirt left on the metal or the filler rod.
- Fix
- Grind off mill scale, then wipe the metal and filler clean with acetone.
Source: Miller Electric; Introduction to Welding 11.4
Loose torch parts
- How to tell
- A loose collet body or cup.
- Fix
- Tighten the torch parts.
Source: Introduction to Welding 11.2
Tungsten gets dirty or balls up
The tip turns black or lumpy, or melts into a big ball, and the arc wanders.
Touching the pool or the filler
- How to tell
- The tip turns black or lumpy after a dip, and the arc starts to wander.
- Fix
- Stop and regrind or replace the tungsten straight away. Welding on with it only makes the weld worse.
Source: Introduction to Welding 11.4
Too much electrode positive on AC
- How to tell
- The tip melts into a big ball when you weld aluminum.
- Fix
- Give it less electrode-positive time in the AC balance (on Miller-style controls, turn the balance up).
Source: Miller Electric
Dirty or peppered aluminum weld
Black specks, a brown film or a dull, contaminated bead on aluminum.
DC instead of AC
- How to tell
- A bead full of melted oxide.
- Fix
- Weld aluminum on AC: the positive half cleans the oxide, the negative half melts the metal.
Welding Polarity Chart: DCEP, DCEN or ACSource: Miller Electric
Not enough cleaning
- How to tell
- A brown film, or flakes like black pepper, in the pool.
- Fix
- Give it more electrode-positive (cleaning) time in the AC balance (on Miller-style controls, turn the balance down).
Source: Miller Electric
Filler added too soon
- How to tell
- Specks appear as soon as you dip the rod.
- Fix
- Wait until the pool looks like a shiny dot before you add filler.
Source: Miller Electric
Oxide or dirt left on
- How to tell
- The metal wasn’t cleaned just before welding.
- Fix
- Clean it right before welding with a stainless brush kept only for aluminum.
Source: Introduction to Welding 21.2; Miller Electric
Cold lap or lack of fusion
Weld metal rolls over the edges or sits on the plate without melting into it.
Arc too long
- How to tell
- The arc wanders between the sides of the joint.
- Fix
- Shorten the arc so the heat goes where you aim it.
Source: Miller Electric
Poor fit-up
- How to tell
- Gaps or uneven edges in the joint.
- Fix
- Fit the parts tight and even before welding.
Source: Miller Electric
Rushing or under-filling
- How to tell
- A thin weld that didn’t melt into the root.
- Fix
- Keep a steady travel speed and add enough filler.
Source: Miller Electric
Cracks in or at the end of the weld
Cracks along the bead, at its edges, or in the dip where the weld stopped.
Stopping abruptly
- How to tell
- A crack in the crater at the end of the weld.
- Fix
- Ease the current down while you keep adding filler, or use the machine’s crater fill.
Source: Miller Electric; Introduction to Welding 11.4
Stainless turns dark or sugars
A gray or dark weld, or a rough, crusty (sugared) back side on stainless steel.
Too much heat
- How to tell
- A gray or dark weld. It can’t be undone, so it has to be prevented.
- Fix
- Lower the amps, travel a little faster or shorten the arc, and use pulse if your machine has it.
Source: Miller Electric
No back purge
- How to tell
- A rough, crusty back side (sugaring).
- Fix
- Back purge the joint with argon, and lower the amps.
Source: Miller Electric
Burn-through on thin metal
The arc melts holes through the plate, or the weld sags out the back.
Too many amps
- How to tell
- A wide, shapeless bead on aluminum, or holes in thin metal.
- Fix
- Lower the amps and travel faster.
Source: Miller Electric
Heat building up
- How to tell
- The part gets hotter as you go and the pool grows.
- Fix
- Tighten the arc and travel faster.
Source: Introduction to Welding 11.4
Quick answers
Why does my welding rod keep sticking?
Most often the amps are too low for the rod. Other causes are pressing too hard when you strike, holding the arc too short, rusty metal or a dirty ground, and damp or damaged flux. Strike with a quick, light scratch and hold about one rod diameter of arc.
What causes porosity in MIG welding?
Most often dirty metal: rust, oil, paint or grease left on the joint. Next comes lost gas coverage: low flow, a leak, drafts, a nozzle clogged with spatter, or too much stickout. Lincoln Electric suggests about 30–40 CFH, set on a flowmeter.
Why is my flux core weld full of holes?
With gasless flux core, check the stickout first (about 1/2–5/8 in from contact tip to work for small wires like Lincoln NR-211-MP), then the voltage: too much gives porosity and worm tracks. Dirty plate is the third common cause.
What causes undercut in welding?
Too much heat at the edges: amps or voltage too high, an arc held too long, or traveling so fast that the pool can’t fill the edges. If it’s on one side only, change your angle.
Why does my MIG wire keep birdnesting?
Usually the drive rolls are set too tight and flatten the wire, or the liner or contact tip is blocked or worn. Match the rolls to the wire: V groove for steel, knurled for flux core, U groove for aluminum.
What causes too much spatter?
With stick: amps too high or a long arc. With MIG: voltage set wrong for the wire speed, long stickout or straight CO2. With gasless flux core: often the wrong polarity: most gasless wire (E71T-11, E71T-8) runs electrode negative, so check the spool.
How do I stop burning through thin metal?
Use less heat and more speed: lower the amps or voltage and move faster. With stick, use a smaller rod, and E6013 rather than E6010 or E6011.
What are worm tracks on a flux core weld?
Marks left by gas from the flux when the voltage is too high for the wire speed. Lower the voltage half a volt at a time until they stop.
- “Introduction to Welding”, Washington State Board for Community and Technical Colleges, CC BY 4.0: sections 8.3, 8.4, 9.2, 9.4, 10.2, 10.4, 11.2, 11.4, 19.2, 20.2 and 21.2.
- Lincoln Electric, “GMAW: Common MIG Problems and Remedies”.
- Miller Electric, “Tips for Troubleshooting Common MIG Weld Defects” (2024) and “Common TIG Welding Problems” (2026).
- Hobart Brothers, “Troubleshooting Common Self-Shielded FCAW Problems” (updated 2025).
- Lincoln Electric, Innershield NR-211-MP data sheet (contact tip to work distance for gasless wire).
- Rod size by plate thickness: ESAB, as used in the metal thickness tool.
- Wind: AWS D1.1/D1.1M, Structural Welding Code — Steel: no gas-shielded welding in wind over 5 mph (8 km/h) without a shelter.
- Randy Williams’s guides on this site: rod sticking, why rods are heated, and welding in the rain.
- Settings in any chart are starting points. Your machine’s door chart and the rod or wire maker’s data come first.
Fixes checked on by Randy Williams against the sources below. Spotted a mistake? Tell us.
- “Introduction to Welding”, Washington State Board for Community and Technical Colleges (CC BY 4.0)
- Lincoln Electric, “GMAW: Common MIG Problems and Remedies”
- Miller Electric, “Tips for Troubleshooting Common MIG Weld Defects”
- Miller Electric, “Common TIG Welding Problems”
- Hobart Brothers, “Troubleshooting Common Self-Shielded FCAW Problems”
- Lincoln Electric, Innershield NR-211-MP (E71T-11) data sheet, contact tip to work distance
- AWS D1.1/D1.1M, Structural Welding Code — Steel: wind protection for gas-shielded welding
- ESAB, “Polarity in Stick Welding: The Basics for Beginners” (rod size by plate thickness)